源码解析-Stack & Queue
# 概述
Stack、Queue、Deque都是队列的概念,但是又有各自的特点,适用于不同的场景,因为底层原理相似所以放在一起讲解。
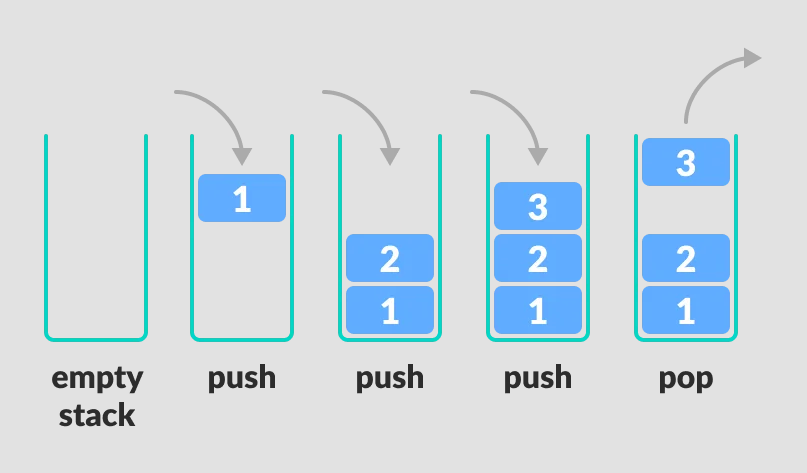
Stack表示堆栈,堆栈的特点:先进后出,如下图
Queue表示队列,队列的特点:FIFO(First In First Out),先进先出,就像排队买东西一样,排在前面的人先买到东西。

Deque表示双端队列,Deque的含义是“Double-ended Queue”,Deque是在Queue的基础上可以随意在头部/尾部进行 插入/删除/查询 等操作,并不要求一定是FIFO的。所以Deque你可以拿来做FIFO队列,也可以拿来做FILO队列,也就是Stack的概念。
Java里有一个叫做Stack的类,却没有叫做Queue的类(它是个接口名字)。当需要使用栈时,Java已不推荐使用Stack,而是推荐使用更高效的ArrayDeque;既然Queue只是一个接口,当需要使用队列时也就首选ArrayDeque了(次选是LinkedList)。
简单总结下如下:
- Stack: FILO队列,Java实现Stack,已不推荐使用,官方推荐ArrayDeque
- Queue: FIFO队列,Java各种实现,比如LinkedList
- Deque: 双端队列,Java众多实现,比如ArrayDeque,LinkedList,既可以当做FIFO使用,也可以当做FILO使用。
综上我们本章重点源码讲解ArrayDeque,在源码讲解之前,我们先看下Java中Queue和Deque的一些方法定义以及区别。
# Queue
Queue接口继承自Collection接口,除了最基本的Collection的方法之外,它还支持额外的插入,获取和查看操作。这里有两组格式,共6个方法,一组是抛出异常的实现;另外一组是返回值的实现(没有则返回null),这里有个前提是:部分Queue的实现是有界的,才会存在这个区别,在可以无限扩容的queue的实现类中,这两种方法很多情况下没有区别,比如:ArrayDeque,所以官方也是推荐使用 不抛异常的方法,比如 offer,poll,peek。
| 抛出异常 | 返回特殊值 | |
|---|---|---|
| 插入 | add(e) //队列满了抛异常 | offer(e) //队列满了返回false |
| 移除 | remove() //队列空的抛异常 | poll() //队列空的返回null |
| 查询 | element() //队列空的抛异常 | peek() //队列空的返回null |
# Deque
Deque是"double ended queue", 表示双向的队列,英文读作"deck"。 Deque 继承自 Queue接口,除了支持Queue的方法之外,还支持插入,移除和查看操作,由于Deque是双向的,所以可以对队列的头和尾都进行操作,它同时也支持两组格式,一组是抛出异常的实现;另外一组是返回值的实现(没有则返回null)。共12个方法如下:
| 操作头部元素 | 操作尾部元素 | |||
|---|---|---|---|---|
| 抛异常 | 返回特殊值 | 抛异常 | 不抛异常 | |
| 插入 | addFirst(e) | offerFirst(e) | addLast(e) | offerLast(e) |
| 移除 | removeFirst() | pollFirst() | removeLast() | pollLast() |
| 查看 | getFirst() | peekFirst() | getLast() | peekLast() |
# ArrayDeque源码分析
# 原理说明
从名字可以看出ArrayDeque底层通过数组实现,为了满足可以同时在数组两端插入或删除元素的需求,该数组还必须是循环的,即循环数组(circular array),也就是说数组的任何一点都可能被看作起点或者终点。ArrayDeque底层的数组的长度必须是2的整数次幂,这么操作的原因是为了后面位运算好操作,ArrayDeque是非线程安全的(not thread-safe),当多个线程同时使用的时候,需要程序员手动同步;另外,该容器不允许放入null元素。
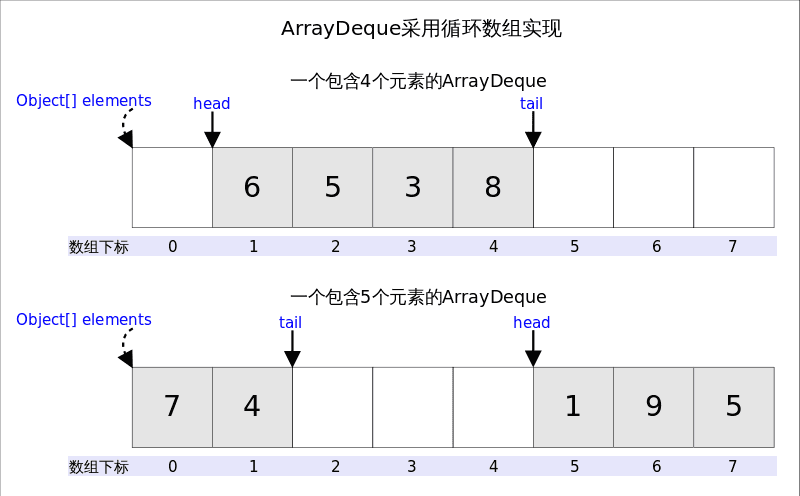
上图中我们看到,head指向首端第一个有效元素,tail指向尾端第一个可以插入元素的空位。因为是循环数组,所以head不一定总等于0,tail也不一定总是比head大。
# 构造函数
    /**
     * The array in which the elements of the deque are stored.
     * The capacity of the deque is the length of this array, which is
     * always a power of two. The array is never allowed to become
     * full, except transiently within an addX method where it is
     * resized (see doubleCapacity) immediately upon becoming full,
     * thus avoiding head and tail wrapping around to equal each
     * other.  We also guarantee that all array cells not holding
     * deque elements are always null.
       //底层存储数据的循环数组
     */
    transient Object[] elements; // non-private to simplify nested class access

    /**
     * The index of the element at the head of the deque (which is the
     * element that would be removed by remove() or pop()); or an
     * arbitrary number equal to tail if the deque is empty.
       数组的头部
     */
    transient int head;

    /**
     * The index at which the next element would be added to the tail
     * of the deque (via addLast(E), add(E), or push(E)).
      数组的尾部,头部尾部只是一个标志,head并不一定比tail小
     */
    transient int tail;

    /**
     * The minimum capacity that we'll use for a newly created deque.
     * Must be a power of 2.
     	在构造器传入初始容量的时候,默认的最小容量8,假设你传入5,也会初始化8个长度的数组
     */
    private static final int MIN_INITIAL_CAPACITY = 8;
    /**
     * Constructs an empty array deque with an initial capacity
     * sufficient to hold 16 elements.
     */
    public ArrayDeque() {
      	//无参构造器,默认初始化16个长度的数组
        elements = new Object[16];
    }
    /**
     * Constructs an empty array deque with an initial capacity
     * sufficient to hold the specified number of elements.
     *
     * @param numElements  lower bound on initial capacity of the deque
     */
    public ArrayDeque(int numElements) {
      	//有参构造器,传入需要初始化的数量大小
        allocateElements(numElements);
    }
    /**
     * Allocates empty array to hold the given number of elements.
     *
     * @param numElements  the number of elements to hold
     */
    private void allocateElements(int numElements) {
        elements = new Object[calculateSize(numElements)];
    }

		/**
    *   该方法核心要实现的就是 寻找到第一个比numElements大的,并且是2的次幂的初始化的容量大小!!
     	  Java中有很多类似的实现,最出名的就是HashMap的初始化容量大小也是一模一样的实现。具体解释看下面
    **/
    private static int calculateSize(int numElements) {
        int initialCapacity = MIN_INITIAL_CAPACITY;
        // Find the best power of two to hold elements.
        // Tests "<=" because arrays aren't kept full.
        if (numElements >= initialCapacity) {
            initialCapacity = numElements;
            initialCapacity |= (initialCapacity >>>  1);
            initialCapacity |= (initialCapacity >>>  2);
            initialCapacity |= (initialCapacity >>>  4);
            initialCapacity |= (initialCapacity >>>  8);
            initialCapacity |= (initialCapacity >>> 16);
            initialCapacity++;

            if (initialCapacity < 0)   // Too many elements, must back off
                initialCapacity >>>= 1;// Good luck allocating 2 ^ 30 elements
        }
        return initialCapacity;
    }
2
3
4
5
6
7
8
9
10
11
12
13
14
15
16
17
18
19
20
21
22
23
24
25
26
27
28
29
30
31
32
33
34
35
36
37
38
39
40
41
42
43
44
45
46
47
48
49
50
51
52
53
54
55
56
57
58
59
60
61
62
63
64
65
66
67
68
69
70
71
72
73
74
75
76
77
78
79
80
81
82
83
上面的最难理解的就是函数calculateSize了,他的主要作用是如果用户输入的长度小于MIN_INITIAL_CAPACITY时,返回MIN_INITIAL_CAPACITY。否则返回比initialCapacity大的第一个是2的整数幂的整数,比如说如果输入的是9返回的16,输入4返回8。calculateSize的代码还是很难理解的,让我们一点一点的来分析。首先我们使用一个2的整数次幂的数进行上面移位操作的操作!
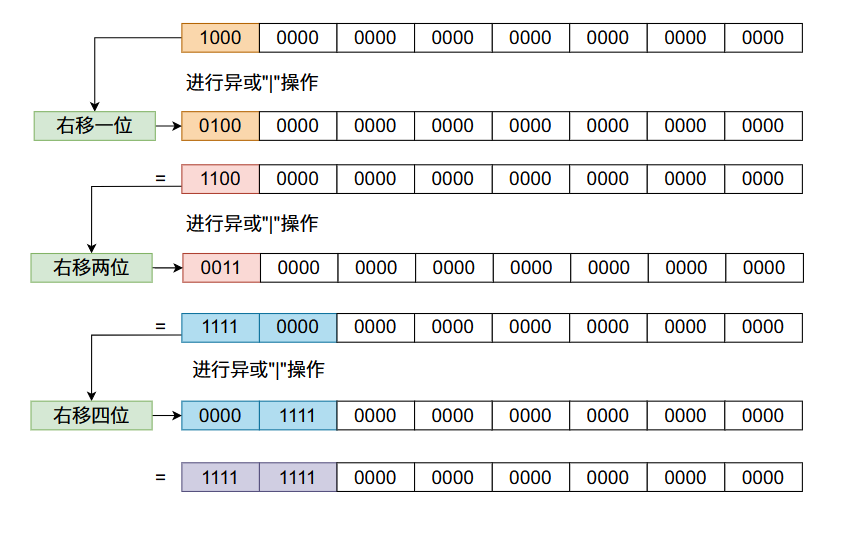
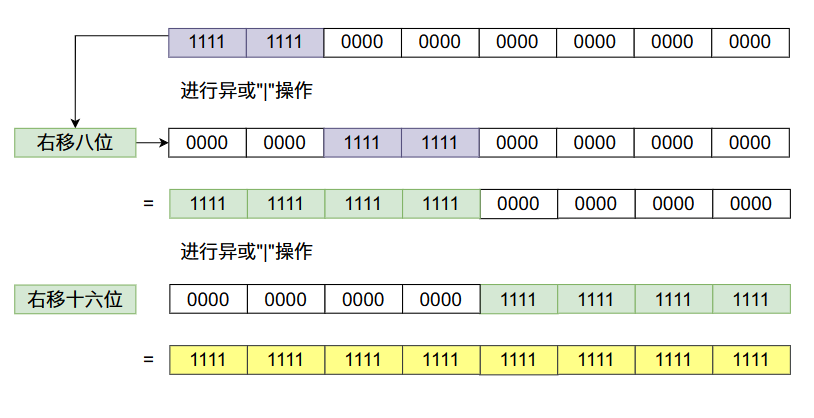
从上图当中我们会发现,我们在一个数的二进制数的32位放一个1,经过移位之后最终32位的比特数字全部变成了1。根据上面数字变化的规律我们可以发现,任何一个比特经过上面移位的变化,这个比特后面的31个比特位都会变成1,像下图那样:

因此上述的移位操作的结果只取决于最高一位的比特值为1,移位操作后它后面的所有比特位的值全为1,而在上面函数的最后,我们返回的结果就是上面移位之后的结果 +1。又因为移位之后最高位的1到最低位的1之间的比特值全为1,当我们+1之后他会不断的进位,最终只有一个比特位置是1,因此它是2的整数倍。
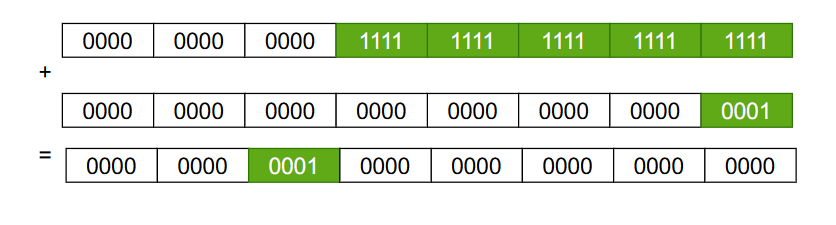
经过上述过程分析,我们就可以理解函数calculateSize了。
# 核心方法解析
# addFirst()
/**
 * Inserts the specified element at the front of this deque.
 *
 * @param e the element to add
 * @throws NullPointerException if the specified element is null
 */
public void addFirst(E e) {
    if (e == null)
        throw new NullPointerException();
      // 若此时数组长度elements.length = 16
    // 那么下面代码执行过后 head = 15
    // 下面代码的操作结果和下面两行代码含义一致
    // elements[(head - 1 + elements.length) % elements.length] = e
    // head = (head - 1 + elements.length) % elements.length
    elements[head = (head - 1) & (elements.length - 1)] = e;
    if (head == tail)
      	//如果head 和 tail重合,则数组满了需要扩容
        doubleCapacity();
}
2
3
4
5
6
7
8
9
10
11
12
13
14
15
16
17
18
19
20
# doubleCapacity()
数组满了,双倍扩容,难点在于理解他扩容后的 head和tail指向问题
/**
 * Doubles the capacity of this deque.  Call only when full, i.e.,
 * when head and tail have wrapped around to become equal.
 双倍扩容,比如之前的 length = 32,扩容后 length = 64,扩容过程参考下面解析
 */
private void doubleCapacity() {
    assert head == tail;
    int p = head;
    int n = elements.length;
    int r = n - p; // number of elements to the right of p
    int newCapacity = n << 1;
    if (newCapacity < 0)
        throw new IllegalStateException("Sorry, deque too big");
    Object[] a = new Object[newCapacity];
    System.arraycopy(elements, p, a, 0, r);
    System.arraycopy(elements, 0, a, r, p);
    elements = a;
    head = 0;
    tail = n;
}
2
3
4
5
6
7
8
9
10
11
12
13
14
15
16
17
18
19
20
上面的代码还是比较简单的,这里给大家一个图示,大家就更加容易理解了:
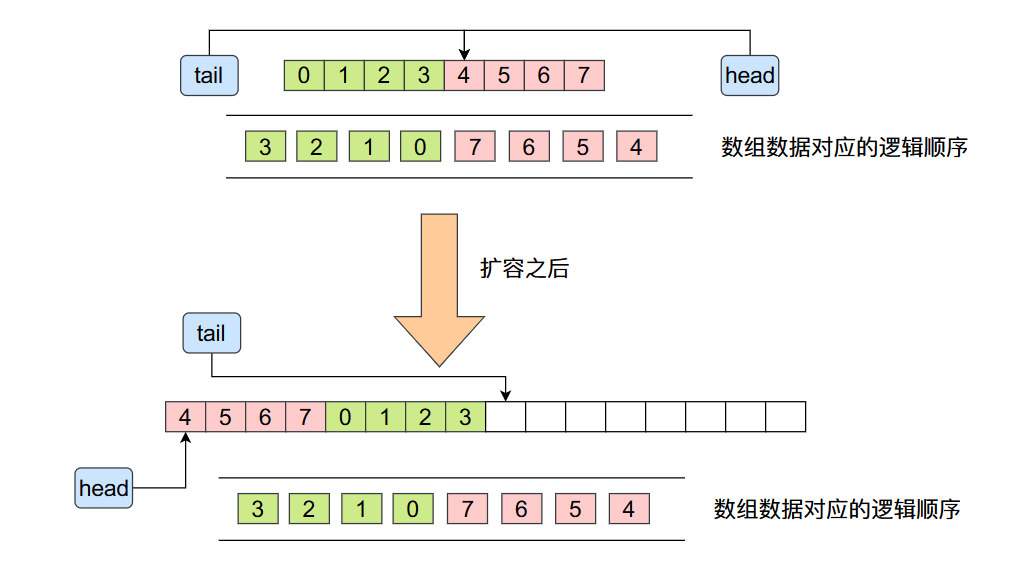
扩容之后将原来数组的数据拷贝到了新数组当中,虽然数据在旧数组和新数组当中的顺序发生变化了,但是他们的相对顺序却没有发生变化,他们的逻辑顺序也是一样的,这里的逻辑可能有点绕,大家在这里可以好好思考一下。
# addLast
addLast跟addFirst原理类似,就不深入解析了
/**
 * Inserts the specified element at the end of this deque.
 *
 * <p>This method is equivalent to {@link #add}.
 *
 * @param e the element to add
 * @throws NullPointerException if the specified element is null
 */
public void addLast(E e) {
    if (e == null)
        throw new NullPointerException();
    elements[tail] = e;
    if ( (tail = (tail + 1) & (elements.length - 1)) == head)
        doubleCapacity();
}
2
3
4
5
6
7
8
9
10
11
12
13
14
15
# pollFirst()/removeFirst()
public E removeFirst() {
    E x = pollFirst();
    if (x == null)
        throw new NoSuchElementException();
    return x;
}


public E pollFirst() {
  	//记录head的位置
  	int h = head;
  	@SuppressWarnings("unchecked")
  	//获取head位置的元素
 	  E result = (E) elements[h];
  	// Element is null if deque empty
  	if (result == null)
    	return null;
  	//原有的head位置的元素置空
  	elements[h] = null;     // Must null out slot
  	//重新计算head的位置,计算逻辑 参考addFirst 类似的逻辑,循环数组的计算逻辑,自己可以画图试试
  	head = (h + 1) & (elements.length - 1);
  	return result;
}
2
3
4
5
6
7
8
9
10
11
12
13
14
15
16
17
18
19
20
21
22
23
# pollLast()/removeLast()
pollLast与removeLast的逻辑和pollFirst/removeFirst基本一致,只不过操作的字段从head变成了tail
/**
 * @throws NoSuchElementException {@inheritDoc}
 */
public E removeLast() {
    E x = pollLast();
    if (x == null)
        throw new NoSuchElementException();
    return x;
}

public E pollLast() {
  	int t = (tail - 1) & (elements.length - 1);
  	@SuppressWarnings("unchecked")
  	E result = (E) elements[t];
  	if (result == null)
    	return null;
  	elements[t] = null;
  	tail = t;
  	return result;
}
2
3
4
5
6
7
8
9
10
11
12
13
14
15
16
17
18
19
20
# 总结
在本篇文章当中,主要跟大家分享了ArrayDeque的设计原理,和他的底层实现过程。ArrayDeque底层数组当中的数据顺序和队列的逻辑顺序这部分可能比较抽象,大家可以根据图示好好体会一下!!!
# 参考文献
https://www.cnblogs.com/Chang-LeHung/p/16479921.html
https://github.com/CarpenterLee/JCFInternals/blob/master/markdown/4-Stack%20and%20Queue.md
https://pdai.tech/md/java/collection/java-collection-Queue&Stack.html